Yellow Square
Rendering a 3D Model from the Terminal without a window manager.
Published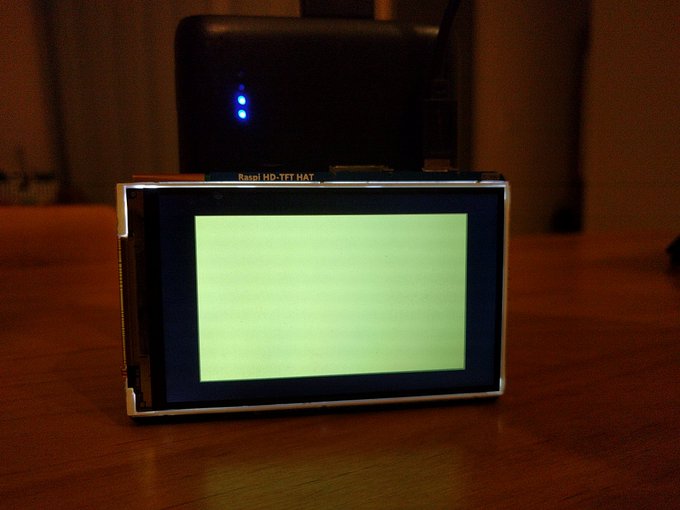
In the previous article, we covered how to draw a single triangle. So we’re going to scale up ever so slightly and draw two triangles with a different color. Even through we attempt to draw a square, the coordinates are stretched to the size of the screen and we end up with a rectangle.
In this article, we’re going to make a few changes to our previous code to do two things. The first is that we are going
to move the boiler-plate code for initializing OpenGL and move it out of our main.c file to make the main.c file easier
to read. And the second is that we’re going to draw another triangle to start to expand our understanding of how different
parameters work in OpenGL.
If you look the file structure in the repository, the files should now look like this:
- main.c
- lib/startScreen.c
- lib/startScreen.h
And that’s becasue we’ve mved the init_ogl and eglGetErrorStr functions out of main.c.
Since those are functions we will not need to edit, taking them out should make our main code a lot simplier and shorter to focus on
the OpenGL side of things.
If we take a look at the function prototypes and the main function, there are now only two functions that we declare
init_shaders and draw_triangles. We’ll first take a look at the init_shaders function.
The first difference is the vertex data. Previous we only drew on triangle, so we had three vertices. In this case we have two triangles, so that means we have a total of six vertices. If we take a look at the following figure we can look at the draw order for the square consisting of two triangles that we want to draw.
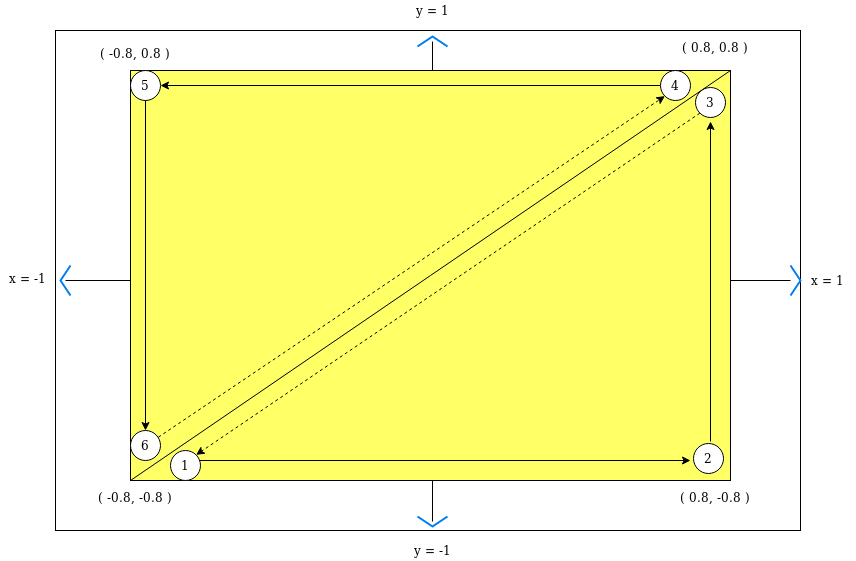
In this case there are two things that we need to address. The first is vertex draw order. In this case we need to make sure that the vertices form a triangle in the counter-clockwise direction. And the reason is because of culling. And basically what culling means is to not draw triangles that don’t need to be drawn to the screen. OpenGL will draw or not draw a triangle depending on the direction of the triangle and where it’s being viewed from. Right now we don’t have any of that in place, we are only looking at the triangles from a static viewpoint, so we just have to make sure the triangles are drawn in a specific direction.
The other point that we need to address with these vertices, is you might be thinking, “why are we using the raw vertices to define all of the points? Wouldn’t it make more sense to only define four vertices and then define the indices for each point?“. And the answer is yes, you can do that. But from the perspective of the OpenGL API it doesn’t make too much difference, as the raw format is going to be direct vertices. You can assign indices and draw that way, but internally OpenGL is going to be looking up the reference for the vertice and then using that directly. So it mostly comes down to a stylistic and memory approach. In most cases the index approach will use less memory, but graphics cards often come with more memory than can normally be utilized so in a lot of cases it doesn’t make too much difference for indexed, versus raw. It generally comes down to a stylistic approach and using raw vertices often ends up being easier. We will be using indexes in the article where we draw the cube.
If you look at the code for generating the buffer in the GPU memory, then you should notice the paramter GL_STATIC_DRAW which defines that we want to use raw vertices instead of indices.
And now seems like a good time to talk about attributes and buffers. So in our shader we declare a vec3 attribute named “vertex”, and we store the position to that location in the shader. An attribute is basically a value provided for every vertex on each draw call. And a vec3 attribute expects three float values. Next we need to tell the shader what values from a buffer want used in this position. And that’s what glVertexAttribPointer is for. First we tell it what attribute we want set, which is the “vec3 vertex” attribute in the shader, we tell it the number of values that go into that position which is 3. Next we tell it the type of value that it should be expecting, which is a GL_FLOAT value.

The next three arguments in this function is where the values in the buffer should be normalized to fixed point values. I’m not exactly sure what this means, I think since we’re already using float values, we put in GL_FALSE for “no”. The next argument is the stride for how many bytes the API needs to jump ahead for the next set of values to line up. In this case we have float values, which are 4 bytes each, and then 3 of them meaning 12 bytes. Incidently enough if we put in 0, the API will assume the values are “tightly-packed”, and jump ahead to the next bytes, which happens to be 12 in this case. I really can’t speak to the effect that it’s better practice to always put in the number of not. And the last value is the offset to the first usable bytes, and since our vertex indices are in this buffer, we have the value of 0 bytes as the first offset.
Last we have our draw_triangles function. And the only difference in this case is for the glDrawArrays call, we have 0, 6 for two triangles instead of 0, 3 that we had for one triangle. For this function the first argument is the type of geometry to be drawn. Possible options are triangles, points, fans, and strips. This tutorial will only use triangles as most of the other options are generally forms of encoded triangles, and using triangles is generally the easiest method to draw shapes. The next argument 0, is the index to the first offset, and the last argument 6 is the count for the number of indices to be drawn. So in the case of triangles this should always be divisible by three.
Review
We skipped over a lot in the first blue triangle article for the purpose of getting a working example to start from. In this article we start to expand on some of the aspects that raised questions from the first article. To start off we increased the number of triangles from one to two, and talked about the draw order and culling. And then we want ahead and provided some context for what some of the arguments entailed for the different shader attributes. In the next article we will get into how to draw an arbitrary number of triangles by drawing a circle.