Red Circle
Rendering a 3D Model from the Terminal without a window manager.
Published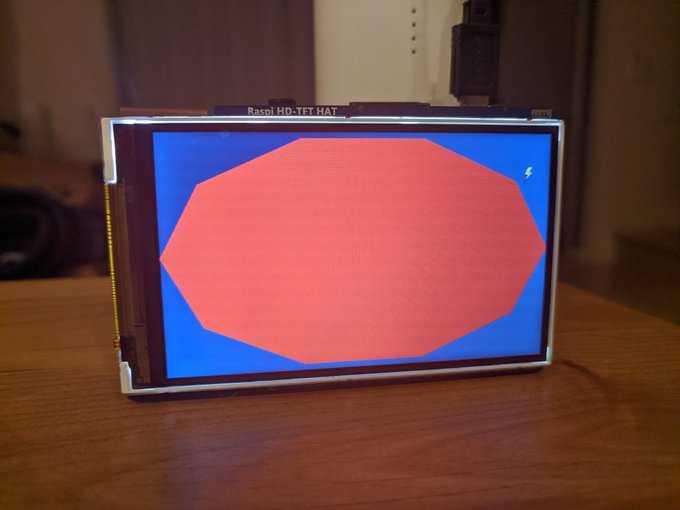
We’ve gone from drawing one triangle, to two triangles, so in this article we cover how to draw an abritrary number of triangles. In this article we generate a circular shape by generating an array of triangles to be drawn during our draw call.
In this article we have two magor changes. The first change is that we move the shaders to be an independent file as opposed
to having the shader declared as a fixed string in the main.c file. Along with this we’re going to start developing a dashgl.h
header file where we will be putting functions that are useful for working with OpenGL in a self-defined library.
The second change is that we’re going to generate a “circle” by generating an arbitrary number of triangles,
to demonstrate to to draw multiple triangles. Let’s take a look at the file layout to see what’s changed.
- lib/
	- dashgl.c
	- dashgl.h
- shaders/
	- fragment.glsl
	- vertex.glsl
- main.c
As you can see we’ve moved the shaders into their own files. So let’s take a quick look at the fragment and vertex shaders respectively.
Basically we have the exact same shader as in the previous article, but we’ve moved it into its own file.
And same with our fragment shader. The only difference is we’ve changed the color from yellow to red. To see how we’re compiling and linking the shaders, let’s go ahead and look at the main.c file to see what’s changed.
Most of our main function is the same from previous articles.
The dgl_init_graphics is a renamed version of init_ogl from the first article, dgl_set_viewport is a renamed version of
setViewport from the second article. And dgl_update_screen is also a renamed version of updateScreen from the second article.
Generally with respect to code, we want to avoid any “magic” syntax that appears out of nowhere, so adding the prefix of dgl_
onto a function gives us a hint that the function is defined in dashgl.h and if someone wants to take a look at it to see how it works,
or to debug something, they know where to find it.
The main difference in the main function is the newly found dgl_create_program function.
Hopefully the purpose of this function is self-evident with the arguments and the name of the function.
The function takes a string for the filename of a vertex shader, and the filename of a fragment shader
and then compiles and links them into a program. We can go ahead and copy the definition here from dashgl.c.
The code here is simply code that was previously in the main.c file in the previous articles,
so there’s not much to cover here. But if you’re interested in looking at the definition for the functions dgl_create_shader
or dgl_print_log you can find the links for those here
and here.
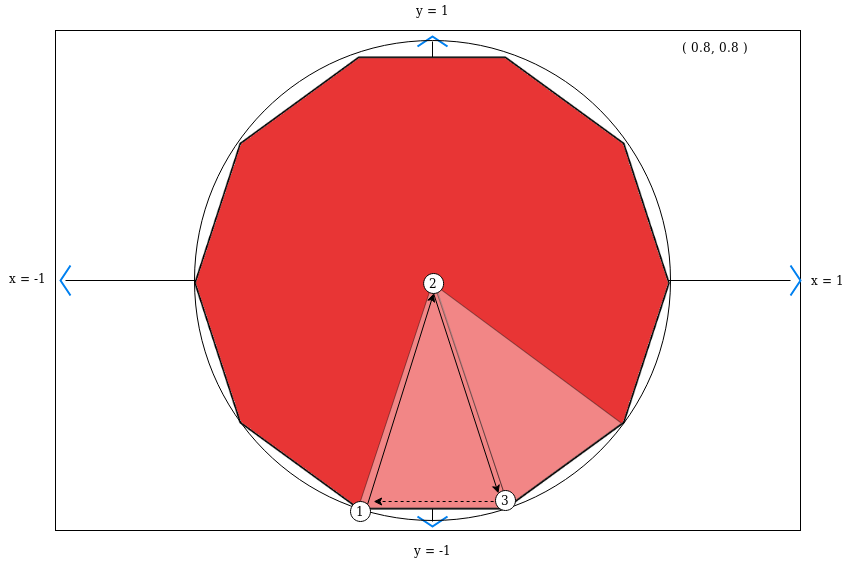
Now that we have the shader aspect out of the way, we might as well get to the part where we generate an arbitrary number of triangles to generate a circular shape. Obviously the more points on the shape we draw, the more round it will appear. In this demo we chose to use a decagon as it would still show straight edges to give some not-so-subtle clues on how it was generated. And specifically how we generate the circle is shown in the figure above, and the code below.
Since the corndinates of the screen we’re working with go from -1 to 1, that means we’re working with a unit circle, so the distance around the circle is simply 2*PI (or tau if you’re civiliazed). So we can divide the distance around the circle into segments as a radian messurement. Then to find the point on the circle we multiply by cos of the radian to get the x position, and the position by sin to get the y position. So to generate triangles around the circle, we find the position of one segment on the circle for the first vertex, move to the center for the second vertex, and then find the position of the next segment for the third vertex. And that way we can generate a circular polygon. If you want to increase the number of segments, you will end up with a more circular result.
The other aspect of genrating mutliple triangles is making sure the size of the buffer and draw calls match up.
In this case we want to look at the glBufferData function. We need to tell OpenGL the size of the array in bytes
to store of all the data that we want to store in GPU memory. Each vertice is going to be three float values.
And for each triangle we have three vertexes. So the size of the buffer is the number of segments (which becomes triangles),
times three coordinates, times three vertices, times the size of a float. As for glVertexAttribPointer we don’t need to
change any of the values as the count has changes, but not the stride, so this function will still work with the
arguments from the previous article.
Finally the last change in this article is the drawArrays function. With this function we need to tell OpenGL
how many triangles we want to draw. So if each triangle has three vertices, then the number we need to put it
needs to be divisible by three. And since we have 10 segments define, that means the length in vertices for
the draw count is 3* 10;
Review
In these first three articles we’ve gone from drawing one triangle, to two triangles, to an arbitrary number of triangles. We’ve filled in on some of the basics of drawing triangles by compiling shaders, bindbing attributes, binding buffers and then drawing to the screen. In the next article we will move our focus to something we have skipped over in these previous articles which is the fragment shader.