Multiple Shapes1
Rendering a 3D Model from the Terminal without a window manager.
Published
In this article we continue to scale up. We’ve drawn a few different shapes, but we’ve never drawn more than one given object on the screen at a time. So how do we draw more shapes on the screen at a time, and what’s the syntax needed to accomplish that? The output for this article is given below.
In this article we’re going to make two changes, and then describe how these changes can actually be implemented in different ways. In this article our objective is to draw four different shapes to the screen. We’re first going to go over the implementation in this article, and then once we’ve cover that present an alternative implementation that we could potentially write its own article about. Either way let’s get started. Most of the code hasn’t changed from the previous article, so let’s focus on the init_buffers function.
Our init_buffers code has turned into a huge block of code. So in our previous chapter, for each shape we created a buffer and then stored our vertex data to the buffer. So does that mean if we have multiple shapes, does that mean we simply repeat the process multiple times for each shape? The answer is mostly yes. We could store all of the shapes into one huge buffer and then only draw the number of triangles for each shape as needed. But then we would need to keep track of the number of triangles that each shape has to be able to do so. In this case we create four different buffers and bind four different shapes to each buffer.
To those who are observant, you might have noticed that we have a lot more values for each vertex. In previous chapters we only had three values for each vertex (x, y and z). In this chapter we have five values for each vertex. So what’s the difference? For that we’ll go alead and take a look at the vertex shader for this article.
In previous articles we had a vec3 vertex attribute that defined where our coordinate was.
And the way we defined where the triangle point was drawn on the screen was accomplished with gl_Position = vec4(vertex, 1.0).
In other words we were using x, y and z coordinates even though we were only using x and y.
In this article we update that to use a vec2 attribute to only provide the x and y coordinates since those are the only ones we’re using.
Then we’ve also added a new attribute vec3 v_color.
If you noticed in the figure for this article we are drawing a blue triangle,
and we are passing in the values of (0, 0, 1) after the x and y coordinates.
So these are actually color values for each vertex.
We want to be able to pass these values to the fragment shader so that we can use these values
to draw the color for each shape. The way we do that is by creating a varying vec3 f_color variable,
and then assigning it the value of vec3 v_color. And then we’re able to use that value in our fragment shader.
Then in our fragment shader, we can use the f_color value passed from the vertex shader,
and pass it directly into the gl_FragColor to be able to define the color for the shape.
Another approach we could use would be to set a uniform and force adjust the color of the material
as we need for every draw call. That being said we haven’t introduced the syntax for using uniforms yet,
so I’m not sure if we would really expect you to know that. But to forshadow for future articles,
the option exists and we will be covering that in an upcoming article.
We have our vertices bound to a buffer, and we have our vertex shader and fragment shaders ready and working.
The next question is how do we manage our draw calls? Up until now we’ve only seen one draw call at a time,
so normal intuition would suggest that we just repeat that four times, but then again that kind of seems brute force and primitive.
Isn’t there a more elagant solution that just repeating the same syntax over and over again like a caveman?
Sorry about another wall of code, but here is the cave man solution.
Now inside of the caveman solution there is actually another point that we need to address with this article
that has not yet come up in previous articles. And that is the use of two attributes at a time.
Up until now we’ve only had position, so we didn’t have to worry about the values that we passed into
glVertexAttribPointer too much. The figure below shows what the current status of the buffer and attributes looks like.
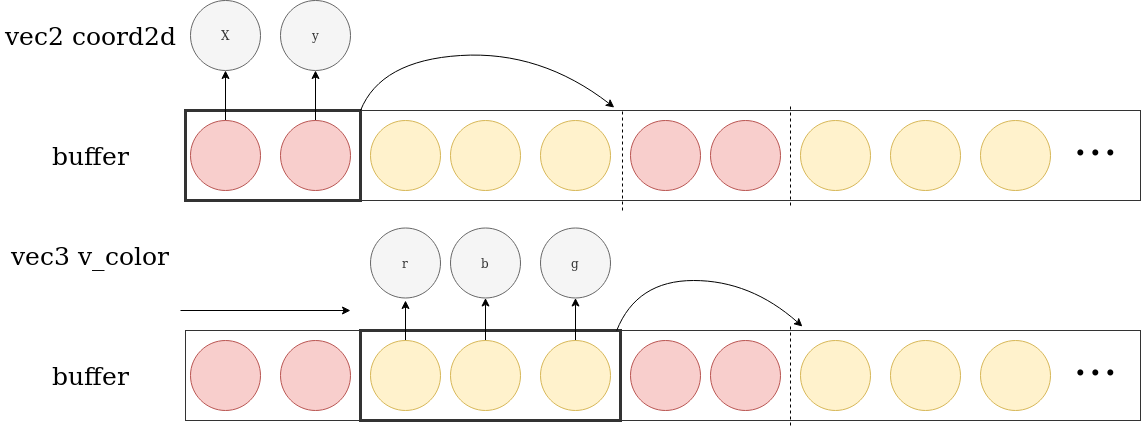
For the vec2 coord2d attribute, we start at the beginning of the buffer,
and use two float values for the x and y position, and then the stride to the start
of the next position value is five float values. For the vec3 v_color attribute,
we need to skip the first two values, and then we input three values and likewise
set the stride to a length of five floats to get the the start of the next set of colors.
We can take another look at these values.
And repeating these calls with the right amount of triangles set will give us the output of four shapes with four colors drawn to the screen.
Review
In this article we ended up posting a lot of verbose code that repeated the same steps like a caveman. The intention was to show that in order to make multiple draw calls, the only steps required were to make multiple of the same call. We also heavily hinted that there was more than one way to approach this. For binding our buffers, we created a buffer for each shape. Another option was to bind all of the shapes to a single buffer and split the draw calls but offset and triangle count. Yet another approach would have been to create two buffers, one for position and one for color and had the attributes stacked together.
Likewise for the color. We used vertex color to define the color for each shape, but we could have also done he same by setting a uniform for each material and each draw call. It’s noted that we haven’t yet used uniforms but it will be used in the next article where we fade a triangle in and out.